How to Submit Your HTML-Based Abstract
If you are reading this, you are likely preparing your first ISMRM abstract using the HTML submission system. This process should be rather straightforward, but we would like to walk you through this step by step.
Word Limits
- Title: 125 characters
- Synopsis: 100 words
- Body of the Abstract: 850 words (references not included)
- Summary of Main Findings: 250 Characters (~35 words)
- Figures: Up to 5
- Figure Captions: 500 characters per caption
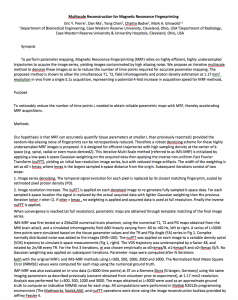 The best way to prepare your abstract for submission is to write and organize your text in any common text editor (e.g. Microsoft Word, iWorks or even vi) without any special formatting. Each section will be entered individually separated by a section header.
There is a 850-word limit for the total abstract length. Please note that this number only includes the body of the text and does not include references, acknowledgements, synopsis or figure captions. You will also need an up-to-100 word synopsis, but this will be added on a separate page. Each abstract can have up to 5 figures, and each figure caption is limited to 500 characters. There is no limit to format of the figures except that they should be less than 2MB in size. The figures will be viewed in an HTML browser, so zooming and panning should be possible as implemented by the browser used by the reader. Please note that both the synopsis and the acknowledgement sections will appear on the preview and on the final abstract, but these will not appear during the review process.
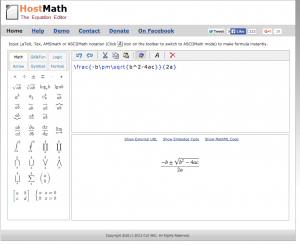 We have found that individual Greek characters come across when copied from Microsoft Word. However, since the abstract will be rendered in HTML, equations are a separate issue. These will be entered using MathJax. For those who are unfamiliar with MathJax or those used to working in e.g. MathType, there are several equation toolboxes on the web. One suggestion is HostMath. To use tools such as this, you can use the buttons on the left to enter the mathematical symbols you need. You can constantly see an update of what your equation will look like on the right. Once you are satisfied with the equation, copy all of the text in the upper window to your document so that you can access it during the submission process.
Once you are ready to submit, you can go to this link on the ISMRM homepage to start the submission process. We have been advised that users should NOT have multiple tabs open at the same time.
You must create a NEW ACCOUNT the first time you visit the submission site for the 2021 Annual Meeting. To do this, click “New to this site?” on the submission site login page. Any accounts you created in past years will not work on this meeting’s submission site.
On the next page you will be able to “Create a new abstract,” which is where we will pick up the story.
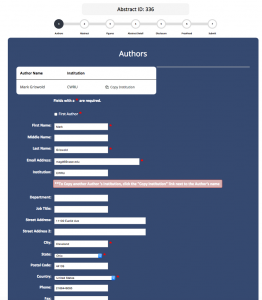 As in previous years, the first task is to input all of the authors on the abstract. This is exactly the same system used in the past, so this should look very familiar to you if you have done an ISMRM abstract before. The only thing to note here is the “First Author” box near the top. This box has to be checked for at least one author.
On the next page, we get to the core of the submission process. In this window, you start with the title at the top. All you need to do is paste the text into this window. All formatting will be stripped from this text.
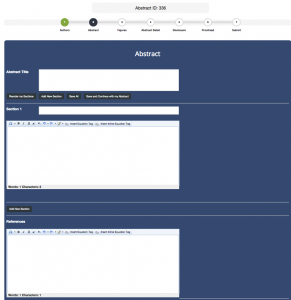 Below this, the abstract is broken into separate sections. Each one is given a number just so that we can keep track of it, but you can give each section a title of your choosing. This could be “introduction” or “methods” or whatever you choose. We have already included sections for “References” and “Acknowledgments.” In the final document, all of these section titles will appear in a different font compared to the body of the text. Below the section title, there is a simple text box where the body text is entered. Again, it is best to copy and paste the text from your editor directly. As with the title, any other formatting that you copied in from your previous document will be stripped. However, in this section, you can also add bold, italic and other formatting to your text.
Please hit “Save All” often to ensure that you don’t lose your work.
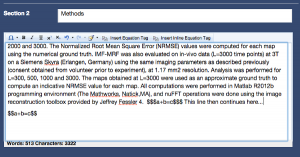 In the upper-right part of this text entry box, you can also see two different options for entering equations into the text. The first option is for an offset equation, which is an equation that will be displayed on a line by itself. The section option is for an inline equation that will appear in the body of the text. There are two buttons to insert the flags for these two options. The “Insert Equation Tag” inserts a “$$” symbol, while the “Insert Inline Equation Tag” inserts a “$$$”.
Please note that you need to have these tags on both ends of your equation or it won’t show up correctly.
As you can see in the figure above, the format should be $$a+b=c$$ for offset equations or $$$a+b=c$$$ for inline equations. Thus the way you get your MathJax equation into this document is to paste the text you copied from HostMath in between these symbols. For example, $$\frac{-b\pm\sqrt{b^2–4ac}}{2a}$$.
Once you are done with your first section, you can add more sections by clicking the “Add Section” button. This will give you another box to enter the section title and the body text for the next section. Continue this process until you are done entering all of the text. Once you’re done, hit “Save and continue with my abstract.” Again, there is a 850 word limit on the abstract length.
Please note that there will be a separate place to enter your synopsis, so please don’t dedicate a section to the synopsis here.
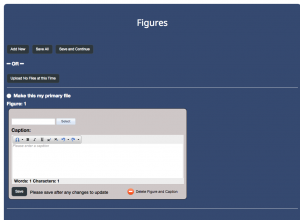 Once you are done entering the text, it’s time to upload your figures. These are done on the next screen. As you might guess, you start by hitting “Add New.” This gives you a separate gray area where you can select a file to upload and enter the figure caption. The system does not automatically number the figure and table captions. Please add something like “Figure 1:” or “Table 1:” when you type in the caption. As a first step, hit the “Select” button at the top. This will bring up a window where you can point to the file on your local machine. These files can be in many formats including jpeg, gif, etc. Once the file is uploaded, you can enter the caption. Once you are done with the caption, hit “save” in the gray area to accept the file and caption. You should see a small preview appear in the gray area. You can upload up to 5 figures for each abstract. Figure captions are limited to 500 characters each. There is a maximum file size of 2MB for each figure. Finally, please upload tables as figures.
There are two additional buttons, “Make this my primary file” and “Make this my secondary file.” These selections are required and will affect which images appear in the Proceedings and digital poster teaser slides.
Digital Poster Previews and Oral Previews
Each session will have a screen displaying a preview of the presentations in that session. In order to accomplish this, you will be asked for the following:
- A choice of a primary and a secondary figure
- A “Summary of Main Findings” (mini-synopsis)
- An institutional logo image file. If you need to acknowledge more than one institution, you must create a single image containing any necessary logos.
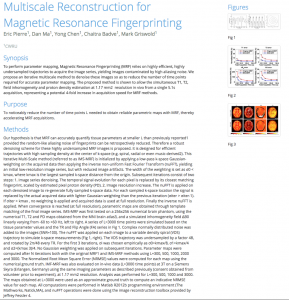 Once you get past this, you should be back into the same system that we’ve used in the past. You need to fill out your disclosures, apply for stipends, etc., but everything should be pretty straightforward. Once you are finished with this, you should end up with a nicely formatted responsive HTML document like the example one on the right.
If you would like an archival PDF of your abstract, please click the Print button. This will generate a PDF version of your HTML abstract.

